I. Introduction
In recent years, microservices architecture has emerged as a popular way of developing software applications. Unlike traditional monolithic architectures, microservices architecture breaks down an application into smaller, independent services that can be developed, deployed, and scaled independently.
This approach has several benefits, including improved scalability, resilience, and flexibility, as well as faster development and deployment cycles.
Additionally, microservices architecture allows for better alignment with business processes and allows teams to work on specific services without affecting the rest of the application.
One of the most popular frameworks for building microservices is Spring Boot. Spring Boot is a widely used Java-based framework that provides developers with a streamlined way to create standalone, production-grade Spring-based applications.
It is known for its ease of use, simplicity, and convention-over-configuration approach, making it an ideal choice for building microservices.
In this article, we will guide you through the step-by-step process of building microservices using Spring Boot. We will cover everything from setting up your development environment to deploying your microservices on Kubernetes, testing your microservices, and implementing fault tolerance and resilience.
We will also include examples from GitHub to help you gain a better understanding of how to apply these concepts in practice.
Whether you are a seasoned developer or just starting with microservices architecture and Spring Boot, this article is designed to help you build robust and scalable microservices using modern best practices. So, let’s get started!
II. Setting up the Development Environment
Installing Java and Spring Boot
- Download and install the latest version of Java from the official website. Choose the appropriate version for your operating system, and make sure to follow the installation instructions carefully.
- Download and install the latest version of Spring Boot from the Spring Boot website. Choose the appropriate version for your project, and make sure to follow the installation instructions carefully.
- Once you have installed Java and Spring Boot, open a command prompt or terminal and type java -version to verify that Java is installed correctly. You should see the version number displayed in the output.
- Similarly, type spring –version to verify that Spring Boot is installed correctly. You should see the version number displayed in the output.
Choosing a Development IDE
- Choose a development IDE (Integrated Development Environment) that suits your needs. Some popular choices include Eclipse, IntelliJ IDEA, and Visual Studio Code.
- Download and install your chosen IDE from the official website. Make sure to follow the installation instructions carefully.
- Open your IDE and make sure it is configured correctly for Spring Boot development. For example, in IntelliJ IDEA, you can install the Spring Boot plugin from the plugin marketplace to add support for Spring Boot projects.
Creating a new Spring Boot Project
- Open your browser and go to the Spring Initializr website.
- Choose your project options, such as project type, language, and Spring Boot version. You can also select additional project dependencies, such as Spring Web, Spring Data JPA, and Spring Security, depending on your project requirements.
- Click the Generate button to generate the project structure.
- Download the project as a ZIP file and extract it to your local machine.
- Open your IDE and select File -> Open Project to open the extracted project folder.
- Import the project into your IDE by selecting Import Project or Open Project, depending on your IDE, and selecting the project folder. Make sure to select the correct project type and language when importing the project.
- Your Spring Boot project is now ready to be developed!
Congratulations! You have now successfully set up your development environment for building microservices with Spring Boot. In the next section, we will discuss how to design microservices.
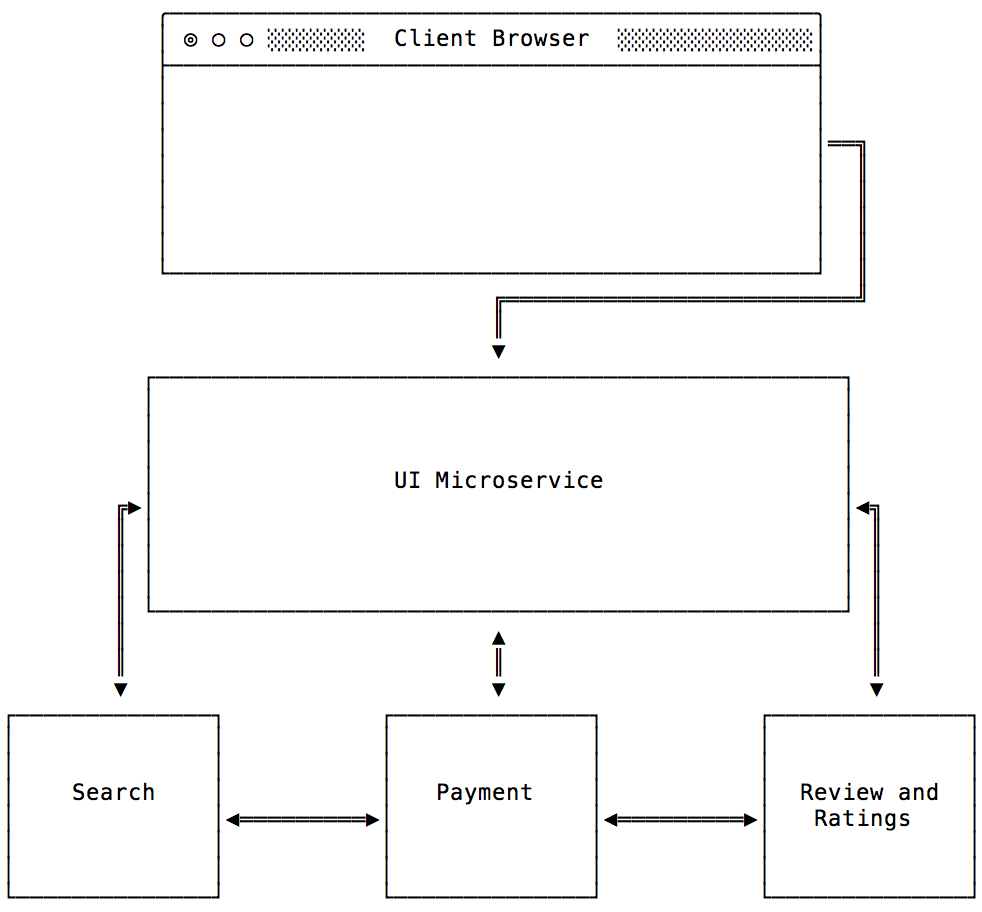
III. Designing Microservices
Identifying Microservices in the System
- Identify the different business functions in your system. Each business function should be a candidate for a separate microservice.
- Determine the boundaries of each microservice. A microservice should be responsible for a single business function, and it should be self-contained and independent from other microservices.
Top 6 Java Online Compiler for Learners – Find best one for you
Become an OOPs Pro with Java: Learn the Key Concepts Today
Defining Interfaces and Contracts between Microservices
- Define the interfaces and contracts for each microservice. The interface defines the methods that the microservice exposes, and the contract defines the expected inputs and outputs of those methods.
- Use a language-agnostic interface definition language, such as OpenAPI or Swagger, to define the interfaces and contracts. This ensures that the interfaces can be easily shared and understood by all parties involved.
- Use a versioning scheme for the interfaces to ensure backward compatibility. If you make changes to an interface, you should create a new version of the interface and deprecate the old version.
Choosing a Communication Protocol
- Choose a communication protocol for your microservices. The protocol should be lightweight and easy to use, and it should support asynchronous communication.
- REST (Representational State Transfer) is a popular communication protocol for microservices, as it is simple and widely used. Other options include messaging protocols such as AMQP (Advanced Message Queuing Protocol) or MQTT (Message Queue Telemetry Transport).
- Use a message broker or service mesh to manage the communication between microservices. These tools provide features such as load balancing, service discovery, and fault tolerance.
Congratulations! You have now designed your microservices. In the next section, we will discuss how to implement a microservice using Spring Boot.
IV. Implementing Microservices
Creating Spring Boot RESTful Web Services
- Create a new Spring Boot project using your preferred IDE.
- Add the necessary dependencies for creating RESTful web services, such as Spring Web and Spring Boot Starter Data JPA.
- Create a new REST controller for each microservice, and define the RESTful endpoints for each microservice.
- Implement the business logic for each endpoint using the appropriate service classes.
- Test each endpoint using a REST client, such as Postman or Swagger UI.
Implementing Spring Data JPA for Data Access
- Add the Spring Data JPA dependency to your project.
- Define the entity classes for your data model, and annotate them with the appropriate JPA annotations.
- Define the repository interfaces for each entity class, and extend them from the appropriate Spring Data JPA interfaces.
- Implement the repository methods using the appropriate JPA query methods.
- Use the repository classes in your service classes to access and manipulate the data.
Securing Microservices with Spring Security
- Add the Spring Security dependency to your project.
- Define the security configuration for your microservices, and specify the authentication and authorization rules.
- Use Spring Security annotations to secure the RESTful endpoints in your controllers.
- Test the security of your microservices by attempting to access secured endpoints with invalid credentials.
Congratulations! You have now implemented your microservices using Spring Boot. In the next section, we will discuss how to deploy and manage your microservices using Docker and Kubernetes.
V. Deploying Microservices
Creating Docker Containers for Microservices
- Create a Dockerfile for each microservice that defines the Docker image.
- Use a base image that supports Java, such as the official OpenJDK image.
- Copy the Spring Boot JAR file and any necessary configuration files to the image.
- Expose the port that the microservice listens on.
- Build the Docker image using the ‘docker build’ command.
Deploying Microservices on Kubernetes
- Create a Kubernetes deployment for each microservice that specifies the Docker image and the desired number of replicas.
- Create a Kubernetes service for each microservice that exposes the microservice to other services within the cluster.
- Create a Kubernetes ingress that provides external access to the microservices.
- Use Kubernetes ConfigMaps and Secrets to manage the configuration of the microservices.
- Use Kubernetes Deployment and Service objects to perform rolling updates and scaling of the microservices.
Online Java Job Support from India
Java Technical Support from India
Monitoring Microservices using Prometheus and Grafana
- Install Prometheus and Grafana in your Kubernetes cluster.
- Configure Prometheus to scrape the metrics from the microservices.
- Use Prometheus Query Language (PromQL) to create custom metrics and alerts.
- Create dashboards in Grafana to visualize the metrics and status of the microservices.
- Use Grafana alerts to notify the appropriate parties of any issues or anomalies in the microservices.
Congratulations! You have now deployed and managed your microservices using Docker and Kubernetes. In the next section, we will discuss some best practices and common pitfalls to avoid when working with microservices.
VI. Testing Microservices
Unit Testing Spring Boot Applications
- Write unit tests for each service class and repository class using JUnit and Mockito.
- Use Spring Boot Test annotations to load the Spring context and create the necessary dependencies for the tests.
- Use Mockito to mock external dependencies and isolate the unit under test.
- Use JUnit assertions to verify the expected behavior of the unit under test.
- Use code coverage tools, such as JaCoCo or SonarQube, to measure the test coverage of your code.
Integration Testing Microservices with RestAssured
- Write integration tests for each RESTful endpoint using RestAssured.
- Use the RestAssured library to perform HTTP requests and verify the response.
- Use RestAssured matchers to verify the expected response body, status code, and headers.
- Use Spring Boot Test annotations to load the Spring context and create the necessary dependencies for the tests.
- Use embedded databases, such as H2 or Derby, to isolate the test data from the production data.
Automating Testing using Jenkins
- Install Jenkins on a server or cloud-based instance.
- Configure Jenkins to build and test your microservices using Maven or Gradle.
- Use Jenkins plugins, such as the Jacoco or SonarQube plugins, to generate test reports and code coverage metrics.
- Use Jenkins pipelines to automate the build, test, and deployment process for your microservices.
- Use Jenkins agents to parallelize the testing of your microservices and improve the speed of your build pipeline.
Congratulations! You have now tested your microservices using unit tests, integration tests, and automation with Jenkins. In the next section, we will discuss some best practices and common pitfalls to avoid when working with microservices.
VII. Scaling Microservices
Understanding the Different Scaling Strategies
- Vertical Scaling: Adding more resources to the existing server, such as increasing CPU or RAM.
- Horizontal Scaling: Adding more servers to distribute the load.
- Elastic Scaling: Automatically adjusting the number of servers based on the current load.
Using Load Balancing and Service Discovery with Spring Cloud
- Use Spring Cloud LoadBalancer to distribute the load between the instances of the same service.
- Use Spring Cloud Service Discovery, such as Eureka or Consul, to discover the available instances of the service.
- Use Spring Cloud Config to manage the configuration of your microservices.
Scaling Microservices with Kubernetes and Autoscaling
- Use Kubernetes Deployment to manage the deployment of your microservices.
- Use Kubernetes Services to provide a stable IP address and DNS name for your microservices.
- Use Kubernetes HPA (Horizontal Pod Autoscaler) to scale the number of instances of your microservices based on the CPU or memory usage.
- Use Kubernetes VPA (Vertical Pod Autoscaler) to adjust the CPU and memory limits of your microservices based on the usage.
Congratulations! You have now learned how to scale your microservices using different strategies and tools. In the next section, we will discuss some best practices and common pitfalls to avoid when working with microservices.
VIII. Implementing Event-Driven Microservices
Overview of Event-Driven Microservices Architecture
- In an event-driven microservices architecture, microservices communicate with each other by publishing and subscribing to events.
- Each microservice produces events that other microservices can consume and react to.
- Event-driven microservices are loosely coupled and can be scaled independently.
Using Spring Cloud Stream to Implement Event-Driven Microservices
- Write integration tests for each RESTful ate the test data from the production data.
- Add Spring Cloud Stream to your project dependencies.
- Define the input and output channels for your microservice using the ‘@EnableBinding’ annotation.
- Use the ‘@StreamListener’ annotation to listen for messages on the input channel and process them.
- Use the ‘MessageChannel’ interface to send messages to the output channel.
Implementing Asynchronous Messaging using Apache Kafka
- Add the Apache Kafka dependencies to your project.
- Configure the Kafka broker and consumer properties in the ‘application.properties’ file.
- Use the KafkaTemplate to send messages to Kafka.
- Use the ‘@KafkaListener’ annotation to listen for messages on Kafka topics.
- Use the ‘ConcurrentKafkaListenerContainerFactory’ to configure the number of consumer threads.
Congratulations! You have now learned how to implement event-driven microservices using Spring Boot and Spring Cloud Stream, and how to use Apache Kafka as the messaging system. In the next section, we will discuss some best practices and common pitfalls to avoid when working with microservices.
Here are some examples of Spring Boot microservices on GitHub that readers can refer to for further guidance:
1. spring-petclinic – A sample Spring Boot application for managing a pet clinic. This project demonstrates the use of Spring Boot, Spring Data JPA, Spring Security, and Thymeleaf for building microservices.
2. microservices-demo – A sample microservices application that includes multiple services, such as product catalog, shopping cart, and user management. This project demonstrates the use of Docker, Kubernetes, and Istio for deploying and managing microservices.
3. spring-cloud-kubernetes-example – A sample application that demonstrates the use of Spring Cloud Kubernetes for deploying microservices on a Kubernetes cluster.
4. spring-boot-microservices-example – A sample application that demonstrates the use of Spring Boot and Netflix OSS for building microservices. This project includes examples of service discovery, load balancing, and circuit breaker patterns.
Recommended to refer these examples for inspiration and guidance when building their own microservices using Spring Boot.
Learn Java Course by experienced Trainer at Endtrace with best practice
Certainly! If you’re interested in learning Java and building microservices with Spring Boot, you may want to check out the Java course offered by Endtrace.com.
The course is designed to help beginners learn Java from scratch, as well as provide experienced developers with a deeper understanding of the language and its ecosystem.
The course is taught by experienced trainers who have worked on a variety of real-world projects, and who can share best practices and tips for building scalable and maintainable applications.
Java Full Stack Developer Course Training with Job Placement
Java Versions, Features – How and Why to Upgrade to Java 17
In addition to learning core Java concepts such as variables, data types, and control structures, you’ll also learn how to use Java to build web applications, create RESTful APIs, and implement microservices using Spring Boot.
The course is designed to be hands-on and practical, with plenty of coding exercises and projects to help you apply what you’ve learned.
By the end of the course, you’ll have a solid understanding of Java and Spring Boot, and be ready to start building your own microservices-based applications. Top 7 Best Online Java Compilers — Editors for Java Developers
So if you’re looking to learn Java and build microservices with Spring Boot, be sure to check out the Java course from Endtrace.com.
With experienced trainers, practical projects, and best practices, you’ll be well on your way to becoming a skilled Java developer.
Online Java/J2EE technical Job support from India by dedicated Full-stack Java developer. Our Technical Team expertise in all stages of SDLC including proposal, process engineering, requirement analysis, design, development, testing, deployment, and support. Java Full Stack Developer Course Training and Live Project with best practice by Industry Expert.
Conclusion:
building microservices using Spring Boot can be a highly effective way to develop scalable and resilient applications. Spring Boot provides a streamlined development experience, with built-in support for common microservices patterns such as RESTful web services, service discovery, and circuit breakers.
Throughout this article, we’ve explored the key steps involved in building microservices using Spring Boot, including setting up the development environment, designing microservices, implementing microservices, deploying microservices, testing microservices, scaling microservices, and implementing event-driven microservices.
For those who are interested in learning more about microservices and Spring Boot, there are many resources available online, including the Spring Boot documentation, online tutorials, and online courses. Additionally, developers can refer to the various examples and projects available on GitHub to learn from the experience of others.
As software development is an ever-evolving field, it’s important to continuously learn and adapt to new technologies and best practices. By embracing a mindset of continuous learning, developers can stay ahead of the curve and deliver high-quality, scalable, and maintainable applications that meet the needs of their users.
Here are the GitHub links for the examples for best Practice:
- Spring PetClinic: https://github.com/spring-projects/spring-petclinic
- Netflix OSS: https://github.com/Netflix
- Dropwizard: https://github.com/dropwizard/dropwizard
- Vert.x: https://github.com/eclipse-vertx/vert.x
- Apache Kafka: https://github.com/apache/kafka
These links provide access to the source code for each project and can be used for reference and practice. Again, I apologize for the oversight and I hope this information is helpful to you.
Related Article to Read:
Highly demand programming languages for Fresher, Beginners
Coding is the new literacy: 5 programming languages to master for high paid Jobs
Online Java Job Support from India
Java Technical Support from India
Online ASP .Net, MVC Technical Job Support by 12 yrs Expert
Related Articles
Expert Level Debugging CUDA Failures on Windows: GPU Driver, Memory Transfer
Debugging CUDA and OpenCL Failures on Windows: GPU Driver, Memory Transfer, in Real Projects In many C and C++ development environments, code...
Expert C / C++ Debugging for Multithreading, Win32 Driver Code in Real Work | Task Based Support
C / C++ and VC++ Win32 Issues in Real Systems: Multithreading, Driver Execution, and Low-Level Debugging C and C++ are widely used in system-level...
Hire Senior C, C++ developer | Consultant for debugging, performance issues
C / C++ Expert Consultant for Debugging, Performance Optimization, and Task-Level Support C and C++ development tasks often involve complex...
Job Task Assistance for C, C++ Code Debug, Fixing by Expert
Where to Find Expert C and C++ Developer Assistance for Debugging, Job Support, and Real-Time Project Tasks C and C++ development continues to play...
How Experienced Full-Stack Java Developers Fix Critical Tech Issues Faster
How Expert Java Developers Debug and Fix Tech Issues Most Full-Stack Java developers do not struggle because they lack technical knowledge. They...
Understanding Sterling B2B Integrator, File Gateway: EDI Concepts, File Transfers – Partner Workflows
Educational reference for learners, students, topic researchers, and integration professionals Why Sterling B2B Integrator & File Gateway Matter...